


This blog post is going to be about how to get the Messy/Wavy hair style look.
Things you will need:
1) Wet hair
2) Hair straighteners (not a must have)
3) Hair curlers (not a must have)
4) 2 Hair bands
In most of my pictures, I usually have Mess/Wavy hair, in this blog post I will be showing you how i achieved this hair style look.

This beach wave hair I have been loving recently, I find this hair style pretty easy to do, I would call it a "quick hair style" But, it does take over night to get this hair style, well, if your hair is thick like mine!
First of all you need to get wet hair, you can either use a spray bottle filled up with water, or, just have a shower/bath!
Now that your hair is wet, you need to section your hair into two parts, either side of your neck.
Now that your hair is wet, you need to section your hair into two parts, either side of your neck.
 Then you need to brush your hair through. The next step you don't necessarily have to do, if not done the waves still appear in your hair, but, I prefer to put some frizz free cream into my hair to make sure my hair doesn't come out all frizzy! I use "Frizz-Ease" -John Frieda and "Foxy Curls" -Bed Head. I find both products help control fizz and also, the Bed Head "Foxy Curls" has an amazing smell to it! (I'm not too sure if you'd like the same smells as i do though...) after you've put the frizz cream in, or not, then you need to plait both sides of your hair (normal plaits will do!)
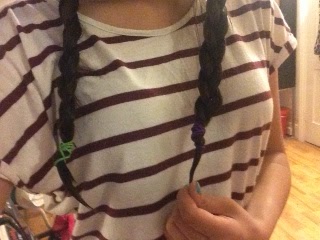
I normally do this hair style right before I go to bed, because, when I wake up my hair is all dry! If you don't have the time, you can always dry your plaits with a hair dryer, but, I'm not to sure the waves will come out the same! But, give it a try, who knows?
When your hair is fully dried, heres where the straighteners come in, I personally use the Babyliss "Ombre Styler 233" if you don't have straightens, don't worry, if you miss out this step it doesn't affect the finish look. Once your hair straighteners are hot, just run some heat over your plaits to make sure the waves come out to there full potential and don't forget to go right to the end of the plait with your hair straighteners!


Then leave your hair to cool off for a bit, now you're ready to take out your plaits!
At the moment, the ends of your hair are slightly straight... if you have straight hair! you can curl your ends with a curler, I use "Babyliss Ceramic Tong & Brush" I find that the small iron curler works better than the bigger one.

Your look is now finished!!!
Some extra things you can do to this hair style is put some volume powder/spray into your hair, or, spray some salt spray! to add some texture and of course if you want your hair style to stay you need Hair Spray!
The salt spray I use is: CatWalk TIGI Salt Spray
The volume powder I use is: Tresemme 24 Hour Body Sky High Plumping Powder
The Hair Spray I use: Bed Head TIGI Masterpiece Massive Shine Hairspray
The volume powder I use is: Tresemme 24 Hour Body Sky High Plumping Powder
The Hair Spray I use: Bed Head TIGI Masterpiece Massive Shine Hairspray
